|
If there is anything I believe in, in regards to the world of home management, it's simplicity.  What do you think of when you think of the term "food storage"? Do you envision rows and rows of canned goods? Five gallon buckets stacked as far as the eye can see? Bunkers of MREs? An episode of Doomsday Preppers? Or is it more like panicky, hyperventilating fits and an overall sense of impending disaster? For me, all I ever really wanted to know was that my family would be fed in case of an emergency--whether that includes a spring storm and subsequent power outage, or one of my "not so good, don't really care if the kids eat ice cream for dinner" days. Someone once asked me what motivated me to "do" my food storage. That one's simple. I know that no matter what happens--whether my house burns to the ground or I slip and break my ankle--my children will still look to me to take care of their basic needs. And so that's what I intend to do. But, honestly, have you seen those lists floating around the internet? You know, the ones that say: Build Your Food Storage the Easy Way!
Yeah, sorry. That's not how I roll. So, I went on a quest. And the result was an entire menu of food storage items that your family will actually eat. Meals that required little preparation, were easy to make, easy to store, and cost effective enough that you could use them any night of the week, not just during a major emergency. And though it has taken me years of research and testing to find the perfect combination of simple, yummy, and affordable food storage to meet my own family's needs, you're about to discover them all in one simple post! So how exactly did I discover these little gems? Well, it all began one night, at the end of the month, where I was down to my last few grocery dollars and (embarrassingly) feeding my family varieties of Hamburger Helper as a result. "Hey, these things are shelf stable!" I though to myself as I loaded up my grocery cart. (Cause, you know, I'm always thinking about stuff like that.) Though, admittedly, they couldn't possibly be that healthy...And I'd have to store a freezer full of hamburger and chicken, which would mean having to buy a generator for power outages...And they don't exactly have any veggies, so I'd have to supplement to make sure we were getting all our vitamins in...And they're only good for a year or so... So what did I do? What I always do. Instead of adapting to some product or system that doesn't quite fit my needs... I adapt it.
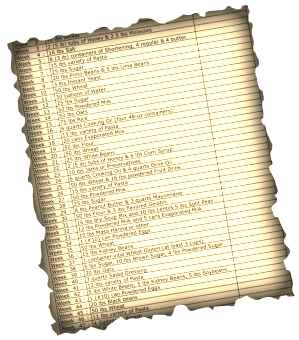
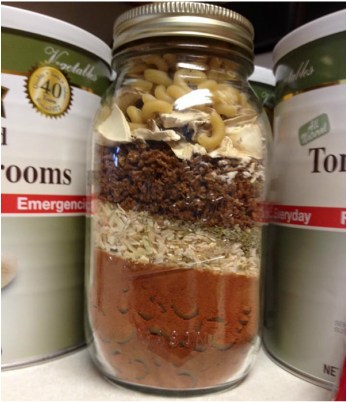
Step I: Find Recipes Your Family Will Eat Lasagna with Mushrooms Lasagna with Mushrooms Like any other type of meal planning, the first thing you need to do is collect a few recipes that you know your family will eat. There is a vast collection of Meals In A Jar sites and cookbooks available, from 'Chef Tess, Bakeresse' to Kathy Clark's Dinner Is In the Jar to my favorite food storage girls over at Food Storage Made Easy. I've started a small collection of some of our favorites (there are those we've tried that we've loved, and others...well...not so much). You can find a downloadable copy of my own Meals In A Jar recipe cards here. Step II: Gather Your Ingredients and Equipment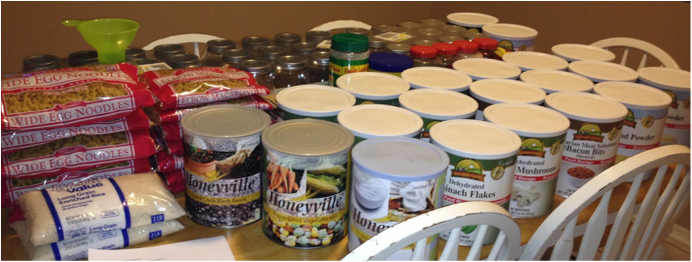 What you'll need:
Step III: Fill Your Jars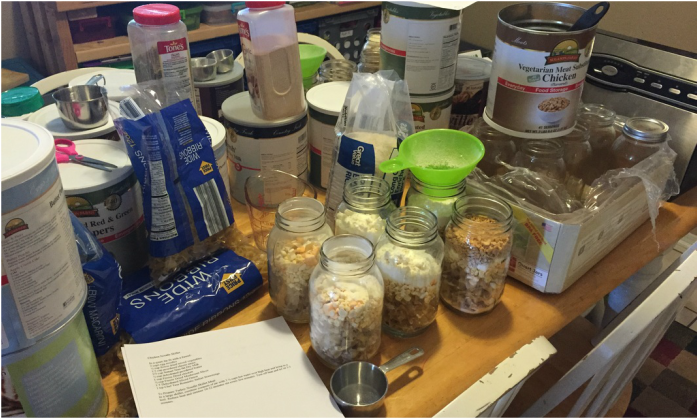 The more organized you are, the easier this part will go. The way we did it was to get together several people to fill the jars and then split them equally. We each chose one recipe to work on at a time, and filled all of the jars for everyone for that recipe, then divided them up. In my little "station" above, I was working on a Cheesy Chicken Noodle recipe. I laid out all of the jars I was working on at a time, then layered the ingredients one by one. If you have a large group of people together doing this, you may want to set up a long table with the ingredients, then have everyone walk down the side of the table with their jars and add their ingredients one by one as if they were filling their plate at a buffet. A few tips to keep in mind: The jars we did with the powders at the top of the jar would not seal correctly because the powder was being sucked out along with the air and getting up underneath the seal. So put powdered items in first, and then cover them with the other ingredients, like beans or rice. (Pat the bottom of the jar on the table to shake the ingredients down into it, so they'll all fit.) Also, even if you end up running out of an ingredient too soon (we ran out of tomato powder and dried mixed vegetables) you can always still put the jar together and add the equivalent ingredient later. For example, you can supplement a can of tomato sauce in place of tomato powder in the Chili recipe, or a can of mixed vegetables in place of the dry ones in the Cheesy Chicken Noodle recipe. Of course, never add wet ingredients into the jars. Just save that tomato sauce for when you actually fix the meal. Step IV: Seal Your Jars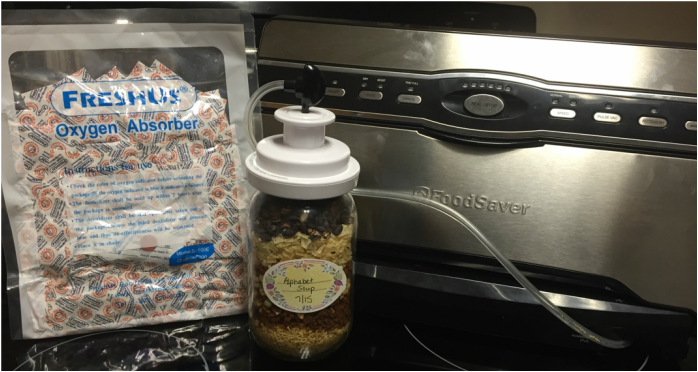 So, you have a couple of different options when it comes to sealing your jars, but the primary goal is to get the oxygen out. The lack of oxygen is what will ensure that your freeze-dried meals stay fresh for a good 5-7 years. You even have the option not to use jars at all--Mylar bags and FoodSaver bags work also but will not last as long nor keep rodents out. Whether you choose to use jars or bags, there are two methods to vacuum sealing them. First, you can use oxygen absorbers. A package of 100 is only about $9.99 from Amazon. Use one per jar or bag (or 3 if you'd like to seal an entire 5 gallon bucket of a staple item, like flour). Afterwards, either seal the Mylar bag with an iron, or place the lid and ring on the jar and seal tightly. You'll know the oxygen has all been removed when the lid "pops." Any leftover oxygen absorbers should be resealed using a vacuum sealer within 24 hours to stay effective. Don't try using a Mylar bag with the FoodSaver system, as it isn't made for a bag that thick. If you chose to use just the FoodSaver bag with the vacuum sealer, know that it will significantly reduce the shelf-life of your freeze-dried meal (to no more than a year or so), as the bags are clear and not as thick, and therefore will still be exposed to aging elements. The other option, of course, is to use the FoodSaver jar sealer attachment. The system is a little pricey (it will cost you about $80 to get the sealer with accessory hose and jar sealer and I was just lucky enough to get the entire system from hubbs for Christmas last year). Remember that regardless of if you're using the FoodSaver or oxygen absorbers, always wipe off the lid and the top of the jar to ensure a tight seal with no contaminants (like stray cheese powder) to get in the way. Step V: Store ThemIt's best to store your jars or bags in a cool, dry, dark place. Avoid storage areas where the temperature and humidity may fluctuate, such as a garage or laundry room. Save the boxes your jars came in for storage and slide them under your bed if you have to. Then sit back and wait for that early spring storm that knocks out the power, or that night when you've been shopping for new school clothes and supplies for hours, been all over creation to doctors, dentists, and eye appointments, are running late for Soccer practice, or are too sick to stomach the sight of raw chicken (or the smell of delivery pizza). Spend a few hours putting together these jars, and then take comfort in the fact that, with no more than a quick glance at your food storage, you'll know exactly how long you can feed your family in a crisis--without having to figure out what to do with 100 lbs of wheat and a case of tomato soup. 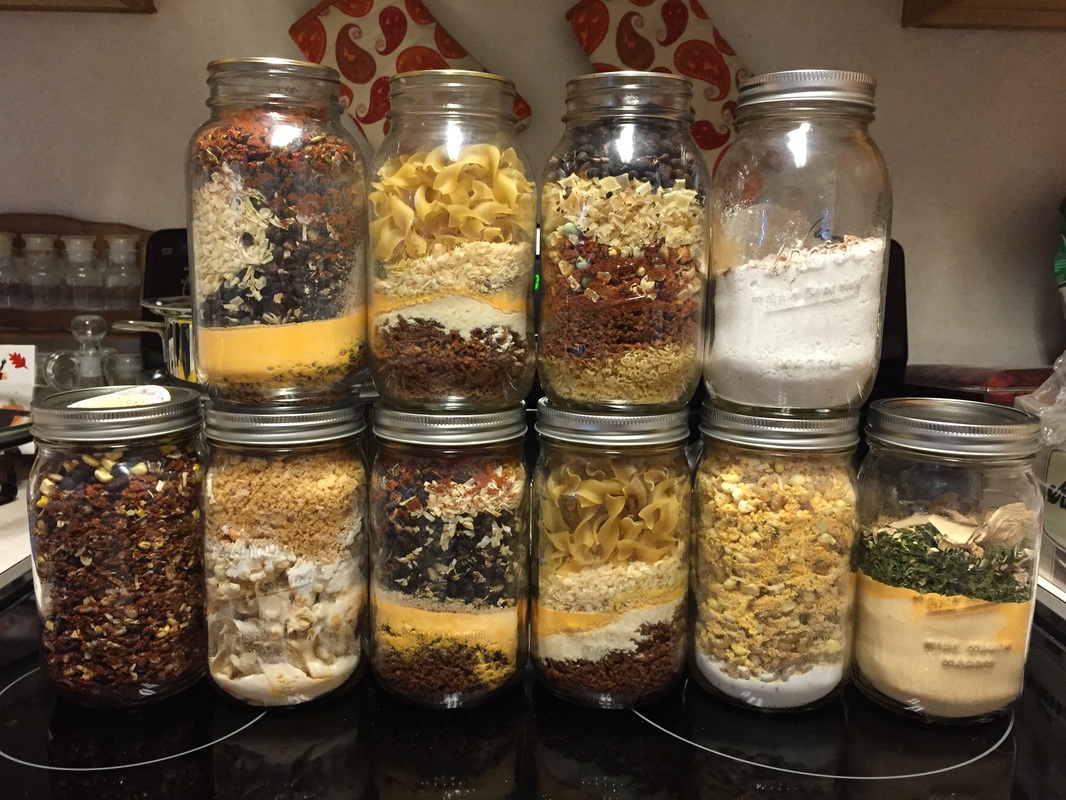
5 Comments
7/18/2015 03:40:40 am
I've seen the food lists like you talked about and immediately thought, "Nope. We don't even eat tomato soup." hahaha. 7/18/2015 06:24:44 am
Michelle, I did not include the prices per jar on the cards, as the prices fluctuate greatly (much like most foods) with changes in the agricultural industry. However, I once estimated that the jars are between $12-$15 each, depending on the ingredients, and if TVP is used instead of freeze-dried meats. However, it has been some time since I came up with those numbers. I can do a more accurate cost analysis per recipe and get it posted as well, to give you a better idea.
Jennifer
7/19/2015 11:38:13 am
These were very fun to put together. Zoe really enjoyed it too. I think it would make a great family project to get everyone involved in and cut down time as well.
Summer Elmer
6/28/2016 12:32:23 am
You really are a very talented lady! This excites me, now just getting started:)
Rachel Guernsey
8/11/2017 12:28:48 pm
Wonderful idea! We just purchased the at home freeze dryer by harvest right. Now our garden won't ever be wasted and keeps even longer. We are working on both drying the ingredients as well as already cooked meals! It saves so much money to dry your own food vs buying it commercially... especially the meat! We also have fun making our own camping/ hiking food in the Mylar bags. Much more transportable than jars. You can also keep rodents out by storing then in plastic buckets. Leave a Reply. |
TopicsArchivesCategories |
 RSS Feed
Photos used under Creative Commons from irrezolut, amsfrank, swanksalot
